Category Archives: Project Log

My collection of web development projects.

Vue Components: Bootstrap Alerts

I’m dabbling with Vue version 3. Here’s Part 1 of 2 in generating a reusable component.


Introduction

Let’s build this. A simple Vue app which demonstrates a reusable notification by way of Bootstrap 4 alerts.

What’s the Goal?

Create a reusable component that displays different types of notifications.

What will we need?

  • Stackblitz – to quickly prototype a Vue project and its dependencies.
  • Bootstrap 4 – to grab some ready-made user interfaces (e.g. alerts).

Step By Step

Step 1: Create Vue App

Step 2: Install Dependencies
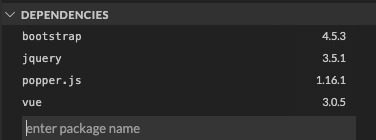
Enter additional dependencies such as bootstrap (jquery and popper is optional but I added it anyway).

Step 3: Add Dependencies to main.js

const { createApp } = require("vue");
import App from "./App.vue";
import "bootstrap"; // Add this import.
import "bootstrap/dist/css/bootstrap.css"; // Add this import.

createApp(App).mount("#app");

Step 4: Modify HelloWorld.vue Component

Out of box, Stackblitz generates a default Vue project paired with a component called HelloWorld.vue.

We’ll repurpose most of this by first renaming it to Notifications.vue.

The Component Code

Debrief of the Notifications component code:

  • Line 2: class binding is assigned passing in a type object.
  • Line 3: apply a slot so HTML can be used in full.
  • Lines 13-15: the prop defined to pass in what type of alert to display.

Debrief of the App component code:

  • Lines 12-14: type attribute will pass in the specific bootstrap class to style the alert.
  • Line 13: the HTML from here will be inserted to the slot assigned in the Notifications component.

Key Takeaways

We’ve now created a reusable component which is dynamic enough to apply Bootstrap’s variety of alerts as well as the ability to pass in a message with full HTML by way of slots.

Additional Resources

Add FAQ to Shopify Collection in 5 Steps

Introduction

An FAQ interface is a straightforward way to provide your customers with the insight they need without the need to call customer service. In this tutorial, I will show you how you can take an existing collection template (irrespective of theme) and add an editable interface by way of sections in 5 easy steps.

This specific case leverages Bootstrap 3 Accordion techniques (as the theme was built with it), however all of this can be integrated via Bootstrap 4, other JavaScript toggling solutions and CSS only implementations.

My 5 step tutorial assumes you have basic/intermediate knowledge of Shopify, HTML/CSS and that you’re able to read a JSON object (see schema tags).

In The Trenches

Step 1

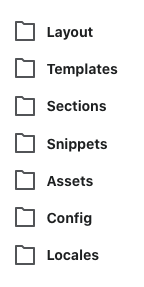
First and foremost, you’ll need to embrace Shopify’s opinion on how code is organized.

Assuming you have access to your store, jump in to Shopify Admin > Online Store > Themes. From the Actions drop-down menu, click Edit code and you’ll be navigated to the online code editor built into Shopify.

Take stock on how Shopify organizes its codebase. You cannot deviate from this opinion. It is a tight structure and the abstractions are intentional.

Step 2

Navigate to Sections directory, click Add a new section and create this new file: collection-faq.liquid.

Step 3

The code. Here’s the breakdown of that in short order:

  • Line 7, 34: The for loop keys off from schema settings defined from line 44.
  • Line 8, 10, 33: A decision will be made to either print a header or a panel.
  • Line 23, 25, 27: A decision will be made to either display or hide the answer.
  • Lines 40-91: The required schema tag which ultimately defines your UI and its editable fields and initial settings.
  • Line 93, 94: optional custom CSS styling to lay on top of this section.
  • Line 96, 97: optional custom JavaScript to lay on top of this section.

Step 4

Reference this newly created section to on your theme’s collection template: /templates/collection.liquid

{% section 'collection-faq' %}

Frankly, you could add this interface to whatever template you see is most fitting for your use case.

Step 5

Test it! Navigate to Shopify Admin > Online Store > Themes and click Customize.

Inside of the preview panel, click into a collection page which leverages your new addition. From there, you will see your FAQ settings on the left panel and a preview screen on the right.

Once inside of the Customize screen, you have full authority in adding/removing FAQs and previewing that in real-time.

Go ahead and add/remove a header, question and an answer! It won’t save unless you click the Save button at the top-right.

Conclusion

Sections are awesome. It’s a great way to extend an established theme with your customizable interfaces.

If I have one gotcha to reinforce it’s this. Always revisit step 1. Acknowledge Shopify’s file system and don’t dance around it. The way it organizes its assets are very much intentional and if you can quickly accept the Physics of this particular world, you’ll very much learn how do these kinds of tasks in 5 steps or less.

Additional Resources

Angular 9 Task App with NgRx & Drag Drop

TLDR – A todo/task list built with Angular 9. This app utilizes Angular Material’s drag and drop out of box and with the help of NgRx, the UI can maintain its previous state on page refresh.


Features

  • Provide sorting by table columns and searching.
  • Add sorting by multiple columns and persist the sorting on refresh.
  • Add the ability to drag and drop columns to reorder them using the native Angular cdk drag and drop.
  • Add ability to manually resize the columns by dragging with the mouse.
  • Use Angular, RxJs and NgRx for state management.

Demo

Conclusions

Easy

Filtering a list of tasks leveraging a search bar was straightforward enough, thankfully. Check out the pipe and how that ties back into the ngModel on the input element for further details. My implementation is for the most part 1:1 from this Stackblitz demo.

Medium

Imagine an excel spreadsheet in which you can resize the cells (see the purple drag handles on the To Do column). It’s a similar ask here.

At the time of this writing, Angular Material does not fully support a way to resize elements. It was asked in 2019 but I didn’t find anything from the current documentation. I found this ngx-cdk-drag-resize demo to be a good starting path leveraging Angular’s ElementRef API out of box.

The other gotcha was sorting by order. AngularJS did it but Angular’s core argument for not including that feature in their current API is simply for performance. Your options are limited to creating your own custom pipe or having your component take on that responsibility. In my case, the dynamicSort() function on my home page component is what I used to sort order attributes in ascending order.

Hard

Saving the order of drag and drop. Saving the order on drag and drop and distinguishing between to do and done. Saving the order on drag and drop, distinguishing between to do and done, refresh the page and ensuring the previous state was maintained.

That. Was. Hard.

My initial thought was to save via localStorage but having localStorage fly on its own was brittle and often caused inconsistencies when ad hoc testing. I needed a strict approach that could thoughtfully manage the user interaction, namely @ngrx/store because at its core everything is immutable. Acknowledging that very rule was hard to embrace but in my opinion it’s the way to go when creating insanely stable Angular web apps.

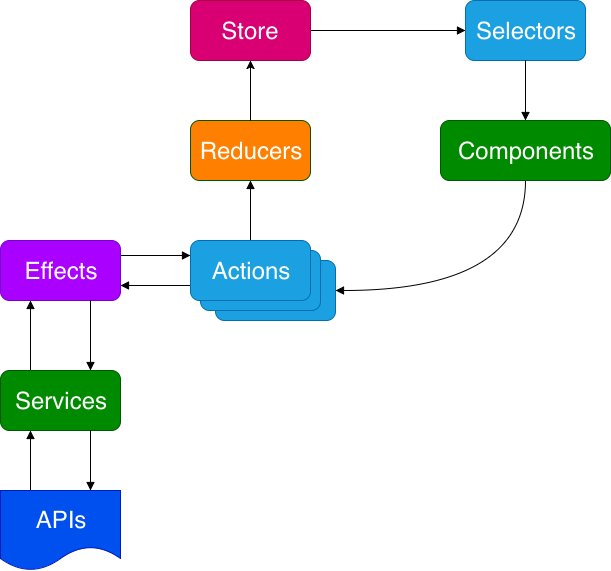
In my case, I used a combination of reducers, actions and effects.

It took me the better of two weeks just to understand NgRx on an elementary level so here’s my tip on how to get through these dense concepts. My suggestion assumes you’ve used Angular on a consistent basis and you’re looking to add on top of your existing knowledge of that.

If you use Angular regularly then you’re familiar with the green action below called Components. You might even be communicating with a backend system which means the other green action, Services and that blue document, APIs are also part of your web app flow. An abundance of Angular tutorials are demonstrated with just these ingredients alone. So if you’re looking to spice it up with NgRx, add the following steps below.

Step 1

Review these additional actions and employ them where needed: Store, Selectors, Reducers, Actions and Effects.

Step 2

Follow the arrows. At all times, follow the arrows.

SOURCE: Adding NgRx to Your Existing Applications

Please feel free to fork this into your own creation.

And remember, when all else fails…StackOverflow. 😉

Aloha. 🤙🏾

Additional Resources